This section will tell you how to initially set up your herd. You can use a combination of importing DHIA data files and manually adding information.
To create a new herd database, select File->New Herd from the main menu and respond to the questions that the New Herd Wizard asks you.
After you have done this, a Herd Explorer window will appear. The herd file will contain several pre-defined check lists, analysis reports, event types, and so on, but will not contain any animals.
At this time you should create one or more technicians. These are people who work with the herd. Do this by clicking on a group under the Technician category on the left side of the Herd Explorer. Then select Object->New Technician from the main menu and provide an technician name in the Technician Dialog.
DairyLive can import a National DHIA Standard Transfer File or a herd history file from AgSource. These files contain lactation and calving information for all cows for the last several years. They do not contain bull information and many events. But it's an easy way to get lots of data into your new herd file quickly.
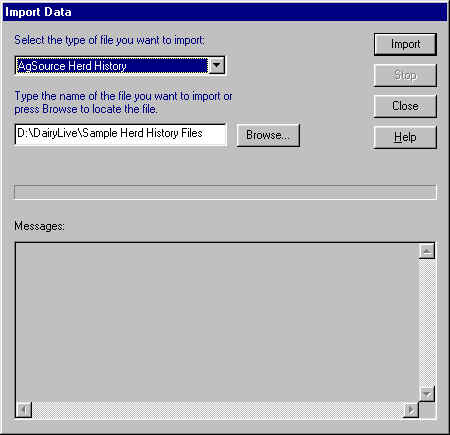
Select Tools->Import Data from the main menu. You will see the Import Data Dialog:
In the File Type drop-down list, select Herd History or Standard Transfer File. If you know the name of the file, you can type it into the File Name box. Or else, click on Browse and locate the herd history file. (NOTE: Standard Transfer Files have a file extension of .STF. Herd history files do not have file extensions).
Click on Import. Shortly you will prompted as follows:
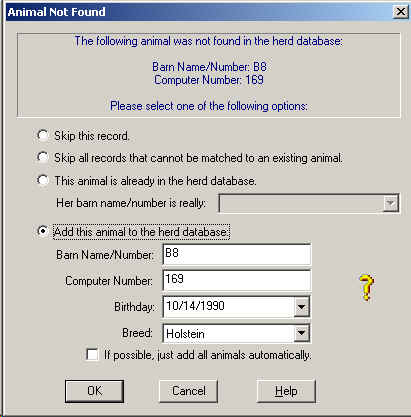
The Import operation found an animal that isn't yet in your herd database. The barn name (or number) that was found in the import file is shown -- you can change it if you want. The computer number, birthday, and breed are also shown. If this looks satisfactory, click on OK. If you don't want to be prompted anymore, check the "If possible, just add all animals automatically" button before clicking on OK.
As the data is imported, a progress bar will grow along the bottom of the dialog box. Depending on your herd size, this operation may take several minutes or more.
After the operation is complete, click on Close. You can now see the animals in the Herd Explorer. They will be placed either in the "Imported from DHI" group or a group such as String 001, String 002, etc. You can create new groups and move them around later.
There are two ways that you can manually add animals to your herd file. If you want to add just one animal, do the following: In the Herd Explorer, click on the animal group you want the animal to be in. Then select Object->New Animal from the menu bar. You'll see the New Animal Dialog:
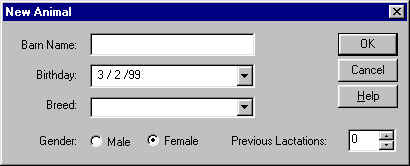
Provide a barn name or number (all barn names and numbers must be unique). And set the birthday. See Entering Dates for information about changing the date field.
Also provide a breed and select the gender. If the new animal is a cow, provide the number of previous lactations. This is the number of lactations the cow has had for which you will not be entering calving data into the herd file (for example, you may have purchased a cow from another person but do not have the calving dates for her).
Now click OK. An Animal Details View for the new animal will appear in the DairyLive main window. You can now provide additional information about the new animal if you want.
The second way to manually add data is to use the Enroll New Animals dialog. Select this option from the Tools menu. You will see a data entry form like this:
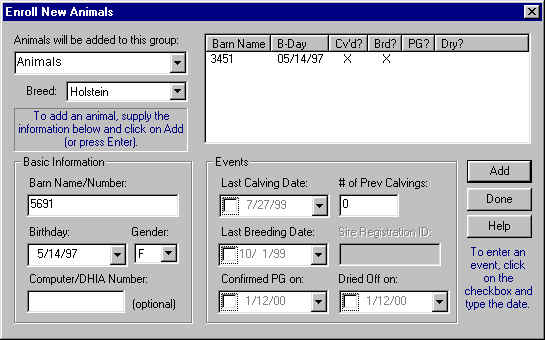
This form is designed for fast data entry. To add an animal, input the basic information and, optionally, the most recent calving, breeding, pregnancy, and dry-off dates. Then click on Add or just press the Enter key on your keyboard. The new animal will be added to the list, and the fields will clear ready for the next animal. When you are all finished, click on the Done button.
If you practice AI, you will probably want to input your semen inventory. For each bull for which you have semen, create a new semen inventory object by clicking on the Semen Inventory category (or a group under it), and then select Object->New Semen Inventory from the main menu. You will see the following Semen Inventory Dialog:
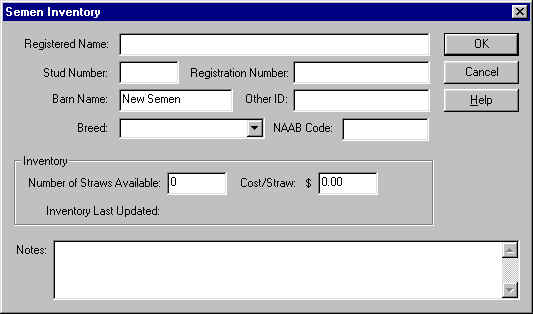
Fill out the information and press OK. The barn name must be unique from all other barn names, including those of your live animals.